Battery switch on travel trailer function is crucial for managing your RV’s power. Understanding how your battery switch works – whether it’s a simple 1-2-both or a more complex system – is key to preventing electrical issues and ensuring you have power when you need it. This guide breaks down everything you need to know, from the different types of switches to troubleshooting common problems and performing basic maintenance.
We’ll cover the inner workings of various battery switch types, providing clear explanations and diagrams to help you understand how power flows through your system. We’ll also delve into safe operating procedures, emphasizing safety precautions to avoid electrical hazards. Finally, we’ll address common issues, offering solutions to get you back on the road quickly.
Battery Switch Types in Travel Trailers
Choosing the right battery switch for your travel trailer is crucial for managing power and preventing accidental discharges. Understanding the different types available will help you make an informed decision based on your needs and setup. This section will explore the common types of battery switches found in RVs, outlining their functionality and advantages/disadvantages.
Battery Switch Types and Their Operation
Travel trailers typically utilize battery switches to control the flow of power from your house batteries to various systems within the trailer. These switches offer a simple way to disconnect your batteries to prevent draining when the trailer is not in use, and to isolate different battery banks if you have a dual-battery setup. The most common types are the 1-2-Both and 1-2-Off switches.
| Switch Type | Description | Advantages/Disadvantages |
|---|---|---|
| 1-2-Both | This switch allows you to select either battery 1, battery 2, or both batteries simultaneously. It’s often a rotary switch with three positions. Internally, it uses a series of contacts that connect or disconnect based on the switch’s position. Think of it like a three-way light switch, but for batteries. | Advantages: Flexibility to use one battery, the other, or both. Disadvantages: Can be more complex to understand initially; increased risk of accidental short circuits if not used correctly. |
| 1-2-Off | This switch offers a simpler approach, allowing you to select either battery 1, battery 2, or to completely disconnect both batteries. It’s typically a rotary switch with three positions. The internal mechanism is simpler than the 1-2-Both, directly connecting or disconnecting each battery to the circuit. | Advantages: Simple operation, reduced risk of accidental short circuits. Disadvantages: Less flexibility than the 1-2-Both; you can’t use both batteries at once. |
| Single Battery Switch (On/Off) | A basic on/off switch controlling only one battery. This is less common in trailers with multiple batteries but is useful for single-battery setups or auxiliary battery systems. Internally, it’s a simple on/off switch, directly breaking the circuit when off. | Advantages: Simple and inexpensive. Disadvantages: Limited functionality, unsuitable for dual-battery systems. |
Examples of Manufacturers and Their Switch Types
While specific models vary, several manufacturers utilize these switch types in their products. For instance, a company like Blue Sea Systems offers a range of high-quality switches, including both 1-2-Both and 1-2-Off options. Other manufacturers like Progressive Dynamics and Go Power! also incorporate these switch types into their charging systems and battery management solutions, although the specific models might vary based on the RV’s design and features.
So, you’re an audiophile who travels? Awesome! First, check out this guide on building an audiophile travel setup for those epic adventures in the wilderness. It’s all about lightweight, durable gear. Then, if you prefer a more vintage sound, head over to this site for ideas on creating a killer audiophile travel setup using classic components.
Remember, portability and sound quality don’t have to be mutually exclusive! Happy listening, wherever your journey takes you.
It’s important to check the specifications of the switch when purchasing to confirm its type and functionality.
Proper Battery Switch Operation
Operating your travel trailer’s battery switch correctly is crucial for both safety and the longevity of your batteries and electrical system. A simple mistake can lead to costly repairs or even dangerous situations. This section will guide you through the process of safely connecting and disconnecting your batteries.Understanding your specific battery switch is paramount before attempting any operation. Different switches have different mechanisms and labels.
Familiarize yourself with your switch’s markings, including any diagrams or instructions that came with your travel trailer. This will prevent accidental short circuits or incorrect connections.
Safe Battery Switch Operation Procedures
Connecting and disconnecting your batteries should always be a deliberate and cautious process. First, locate your battery switch, typically found near your battery bank or in a convenient access panel. Ensure the surrounding area is clean and dry to prevent accidental shorts. Then, follow these steps:
- Connecting the Batteries: If the switch is in the “OFF” position, carefully turn the switch to the “ON” position. Listen for any unusual sounds or sparks; if either occur, immediately turn the switch back to “OFF” and seek professional assistance.
- Disconnecting the Batteries: To disconnect your batteries, carefully turn the switch to the “OFF” position. This will interrupt the power flow to your appliances and accessories, preventing drain on your batteries.
Safety Precautions for Battery Switch Operation
Taking the necessary safety precautions is essential to prevent electrical hazards. Neglecting these precautions can result in serious injury or damage to your equipment.
- Always turn off all appliances and electronics before operating the battery switch. This prevents power surges and potential damage when the circuit is interrupted or re-established.
- Never touch any metal parts of the battery or switch while the switch is in the “ON” position. This includes the battery terminals and the switch itself.
- Keep the area around the battery switch clean and dry. Moisture can create a conductive path, increasing the risk of a short circuit.
- Wear appropriate safety glasses or eye protection when working near batteries, as they can sometimes produce sparks or corrosive fumes.
- If you are unsure about any aspect of operating the battery switch, consult a qualified RV technician or electrician. It’s better to be safe than sorry.
Troubleshooting Common Battery Switch Issues
Your travel trailer’s battery switch is a critical component, controlling the flow of power to your house batteries and ensuring your appliances work correctly. Problems with the switch can leave you stranded without power, so understanding how to troubleshoot common issues is essential. This section will guide you through identifying, diagnosing, and resolving some typical problems.
Identifying Common Battery Switch Problems
Several issues can arise with your travel trailer’s battery switch. The most common include a complete lack of power to the trailer’s 12V system, blown fuses within the switch itself or in related circuits, a switch that feels loose or doesn’t click firmly into place, and intermittent power issues where the system works sometimes but not others.
These problems can stem from a variety of causes, from simple wiring issues to a completely failed switch.
Diagnosing Battery Switch Problems
Before you start replacing parts, a systematic approach to diagnosis is crucial. Begin with a visual inspection of the switch and its surrounding wiring. Look for any obvious signs of damage, such as loose connections, burnt wires, or corrosion. Pay close attention to the fuses both within the switch itself (if it has integrated fuses) and in the main power distribution panel.
A blown fuse will usually have a broken filament visible through the clear plastic window.If a visual inspection doesn’t reveal the problem, basic electrical testing is necessary. You’ll need a multimeter capable of measuring voltage and continuity. Remember to disconnect the negative battery terminal before starting any electrical testing to prevent accidental shorts.
Testing for Power at the Battery and Switch
First, check the voltage at the battery terminals using your multimeter. You should read approximately 12.6V for a fully charged battery. If the voltage is significantly lower, the problem lies with the battery itself, not the switch.Next, test for voltage at the output terminals of the battery switch. If you have voltage at the battery but not at the switch output, the problem is likely within the switch itself or the wiring leading from it.
Here’s how to test the voltage using a multimeter: // Set your multimeter to measure DC voltage (usually indicated by a "V" with a "—" symbol).// Connect the red lead of your multimeter to the positive (+) output terminal of the battery switch.// Connect the black lead of your multimeter to the negative (-) output terminal of the battery switch.// Read the voltage displayed on the multimeter. A reading close to the battery voltage indicates a good connection.
Testing Switch Continuity, Battery switch on travel trailer function
If the voltage test at the switch output is low or zero, test the continuity of the switch itself. To do this, you’ll need to turn the switch OFF. Then: // Set your multimeter to measure continuity (usually indicated by a symbol that looks like a diode).// Connect one multimeter lead to one of the switch's input terminals.// Connect the other multimeter lead to the corresponding output terminal.// The multimeter should beep if the switch is good. If there's no beep, the switch is likely faulty.Remember to repeat this for all positions of the switch.
Resolving Battery Switch Issues
If you’ve identified a blown fuse, simply replace it with a fuse of the same amperage rating. Never replace a fuse with one of a higher amperage; doing so could damage other components or create a fire hazard. If the switch itself is faulty, it needs replacement. This usually involves disconnecting the wiring from the old switch, carefully noting the wire positions, and then connecting the new switch in the same configuration.
Always consult your trailer’s wiring diagram if you are unsure about the wiring connections. If the problem is with the wiring, repair or replace any damaged or corroded wires. Tighten any loose connections. If you’re uncomfortable performing electrical work, consult a qualified RV technician.
Battery Switch and Charging Systems Integration
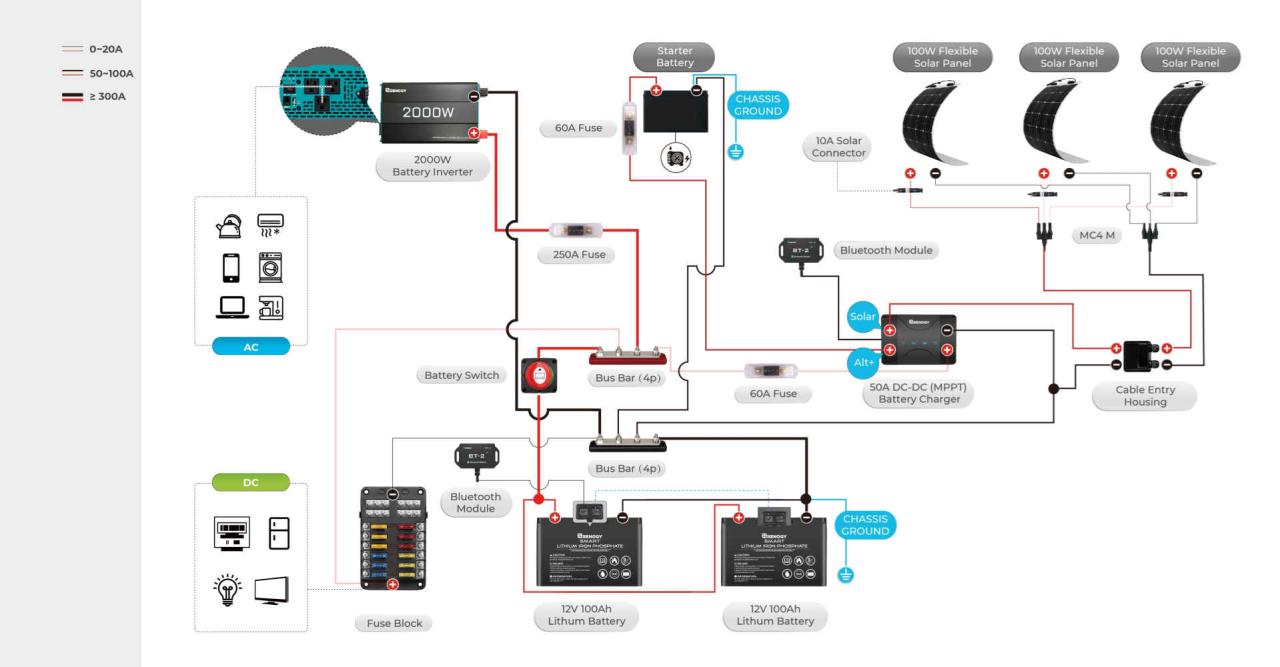
Your travel trailer’s battery switch is the central control point for managing power flow to your batteries, and understanding its interaction with your charging system is crucial for maintaining battery health and preventing electrical issues. This section will explain how the switch affects charging from various sources and how to visualize this power flow.The battery switch acts as a gatekeeper, determining which charging sources can feed power to your battery banks (house batteries and potentially a chassis battery).
Its position dictates which batteries receive power and from which sources. Improper use can lead to undercharging, overcharging, or even damage to your batteries or charging system.
Power Flow with Different Switch Positions
Understanding the power flow is essential for safe and effective battery management. The following flowchart illustrates how power flows with the switch in different positions (assuming a typical two-battery system with a switch controlling both):
+-----------------+     +-----------------+     +-----------------+
|   Shore Power   |---->| Battery Charger |---->| Battery Switch  |
+-----------------+     +-----------------+     +-----------------+
                                                    |
                                                    | ON:  House Batteries
                                                    V
                                             +-----------------+     +-----------------+
                                             | House Batteries  |-----|  Loads          |
                                             +-----------------+     +-----------------+
                                                    ^
                                                    | OFF: No Power to House Batteries
                                                    |
                                             +-----------------+     +-----------------+
                                             | Alternator      |---->| Battery Switch  |
                                             +-----------------+     +-----------------+
                                                    |
                                                    | ON: House Batteries (if connected)
                                                    V
                                             +-----------------+     +-----------------+
                                             | House Batteries  |-----|  Loads          |
                                             +-----------------+     +-----------------+
                                                    ^
                                                    | OFF: No Power to House Batteries
                                                    |
                                             +-----------------+     +-----------------+
                                             |    Solar Panel   |---->| Solar Controller|---->| Battery Switch  |
                                             +-----------------+     +-----------------+     +-----------------+
                                                                                             |
                                                                                             | ON: House Batteries (if connected)
                                                                                             V
                                                                                       +-----------------+     +-----------------+
                                                                                       | House Batteries  |-----|  Loads          |
                                                                                       +-----------------+     +-----------------+
                                                                                             ^
                                                                                             | OFF: No Power to House Batteries
Simplified Schematic Diagram
The following describes a simplified schematic diagram of the system. Imagine a rectangle representing the battery switch with several terminals. One terminal is connected to the positive (+) terminal of the house battery bank, another to the negative (-) terminal of the house battery bank. Separate wires connect other terminals to the output of the battery charger (shore power), the alternator output (through a voltage regulator), and the output of the solar charge controller.
The loads (lights, appliances, etc.) are connected to the house battery bank. The switch controls the connection between the charging sources and the battery bank. When the switch is ‘ON’, the connection is made, allowing charging. When ‘OFF’, the connection is broken, isolating the batteries from the charging sources and the loads. A similar setup (though often simpler) would exist for a chassis battery, if present, and it may or may not be controlled by the same switch.
Battery Switch Maintenance and Replacement

Keeping your travel trailer’s battery switch in top condition is crucial for reliable power. Regular maintenance prevents problems and extends the life of your switch, saving you time and money in the long run. Neglecting maintenance can lead to corrosion, malfunction, and even potential fire hazards. This section details a simple maintenance schedule and safe replacement procedures.
Routine Battery Switch Maintenance
A simple visual inspection and cleaning should be part of your regular pre-trip checklist. Start by disconnecting the battery cables from the switch to prevent accidental shorts. Use a wire brush or sandpaper to clean any corrosion from the battery terminals and the switch terminals themselves. A baking soda and water paste can help neutralize any acid buildup.
So, you’re an audiophile who loves to travel? Awesome! Check out this guide on building the perfect audiophile travel setup for pristine sound on the go. It covers everything from portable DACs to noise-cancelling headphones. Then, for a different perspective on compact high-fidelity, explore the tips and tricks offered by audiophile travel aetup – they focus on vintage gear and achieving amazing sound quality with smaller, more easily transportable equipment.
Get ready to enjoy your favorite tunes wherever your adventures take you!
After cleaning, apply a corrosion inhibitor or dielectric grease to the terminals to prevent future corrosion. This process should be repeated every three to six months, or more frequently if you notice signs of corrosion. Inspect the switch itself for any damage, loose connections, or signs of overheating. If you see any problems, address them immediately.
Replacing a Faulty Battery Switch
Replacing a battery switch is a straightforward task, but safety should always be your top priority. Before starting, disconnect both battery cables from the switch. You’ll need a basic set of tools: a wrench or socket set appropriate for the switch’s mounting bolts, a screwdriver (if necessary for the switch’s cover), and wire cutters/strippers (if replacing wires). Carefully remove the switch from its mounting location, noting the wiring configuration before disconnecting any wires.
Install the new switch, ensuring that all wires are correctly connected according to the wiring diagram. Secure the switch in its mounting location and reconnect the battery cables. After installation, test the switch to confirm it’s functioning correctly. Remember to always consult your travel trailer’s wiring diagram to ensure proper connection.
Battery Switch Lifespan and Reliability
The lifespan of a battery switch varies depending on the brand, type, and usage. Generally, a well-maintained switch can last for several years, sometimes even a decade or more. However, harsh environmental conditions, such as extreme temperatures and moisture, can significantly shorten its lifespan. High-quality switches from reputable brands, such as Blue Sea Systems or Perko, are typically more reliable and durable than cheaper alternatives.
These brands often use more robust materials and construction techniques, resulting in better corrosion resistance and longer life. While a simple on/off switch might be cheaper initially, an upgrade to a more sophisticated switch with features like multiple banks or remote control capabilities can offer long-term benefits and increased convenience. Consider the expected use and environmental conditions when selecting a switch to ensure it meets your needs and has a suitable lifespan.
For example, a marine-grade switch designed for saltwater environments will likely offer better corrosion resistance than a standard automotive switch in a humid climate.
Impact of Battery Switch on Travel Trailer Electrical Systems
Your travel trailer’s battery switch is the central control for your 12-volt DC power system. Understanding its function is crucial for safe and reliable operation of your appliances and preventing damage to your electrical components. The switch dictates which power source feeds your trailer’s electrical systems – your house batteries or shore power.
The battery switch directly impacts how your appliances run and whether they’re operational at all. Improper use can lead to unexpected power outages, damage to sensitive electronics, or even a complete system failure. Let’s examine this in more detail.
Appliance Operation and Battery Switch Position
The position of your battery switch directly determines which power source is available to your travel trailer’s appliances. Incorrect settings can result in unexpected power failures or, worse, damage to your electrical system. This table clarifies the relationship between the switch position, power source, and appliance functionality.
| Appliance | Power Source | Switch Position (Example: Off, Battery, Shore Power, Both) | Operational Status |
|---|---|---|---|
| Interior Lights (LED) | 12V DC Battery | Battery or Both | Operational |
| Interior Lights (LED) | 12V DC Battery | Off or Shore Power | Non-operational |
| Water Pump | 12V DC Battery | Battery or Both | Operational |
| Water Pump | 12V DC Battery | Off or Shore Power | Non-operational |
| Refrigerator (12V DC mode) | 12V DC Battery | Battery or Both | Operational (may run less efficiently on battery alone) |
| Refrigerator (12V DC mode) | 12V DC Battery | Off or Shore Power | Non-operational |
| Air Conditioner | 120V AC Shore Power | Battery or Both | Non-operational (requires AC power) |
| Air Conditioner | 120V AC Shore Power | Shore Power | Operational |
| Microwave | 120V AC Shore Power | Battery or Both | Non-operational (requires AC power) |
| Microwave | 120V AC Shore Power | Shore Power | Operational |
Consequences of Improper Battery Switch Use
Leaving the battery switch in the wrong position can lead to several problems. For instance, if the switch is left on “Both” while connected to shore power, it can potentially overcharge your batteries, leading to damage or even explosion. Conversely, leaving the switch in the “Off” position while relying on battery power will result in a complete power outage, leaving you without lights, water, or other essential appliances.
Leaving the switch on “Battery” when connected to shore power prevents your batteries from charging. In short, understanding and correctly using your battery switch is critical for the longevity and proper function of your travel trailer’s electrical system.
Mastering your travel trailer’s battery switch is a vital skill for any RVer. By understanding its function, performing regular maintenance, and knowing how to troubleshoot common problems, you can ensure reliable power for all your onboard appliances. This knowledge not only prevents frustrating breakdowns but also contributes to the longevity of your RV’s electrical system, saving you time, money, and potential headaches down the road.
Remember, a little preventative care goes a long way!
Essential Questionnaire: Battery Switch On Travel Trailer Function
What happens if I leave my battery switch in the “off” position for an extended period?
Leaving your switch off for a long time won’t damage the switch itself, but your house batteries won’t receive any charge from your charging sources (shore power, alternator, solar). This will lead to discharged batteries.
Can I use a multimeter to test my battery switch?
Yes, a multimeter can help diagnose issues. You can test voltage at various points in the circuit to identify breaks or shorts.
How often should I inspect my battery switch?
A visual inspection every few months is recommended to check for corrosion, loose connections, or damage.
What type of fuse should I use to replace a blown fuse in my battery switch?
Always replace a blown fuse with one of the same amperage rating. Check your switch’s specifications or owner’s manual.
